OAuth2 (Open Authorization 2.0) is an industry-standard protocol for secure authorization, enabling applications to access user data without exposing login credentials. It simplifies authentication by allowing users to grant permissions through third-party providers like Google, ensuring both security and user convenience. In this article, I’ll walk you through the process of implementing OAuth2 integration with Google for secure user authentication. I’ll cover the setup, configuration, and code required to streamline the login process in your application.
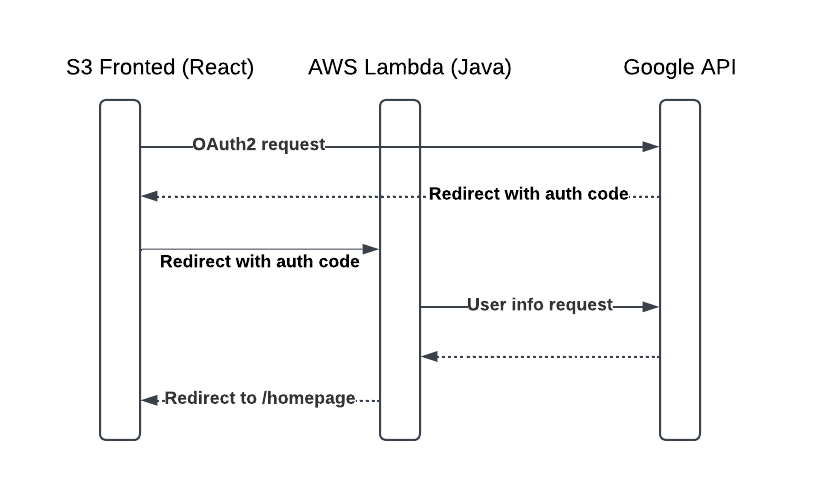
The pseudo-sequence diagram below illustrates the authorization flow using Google within the AWS infrastructure employed for this implementation. Amazon S3 serves as the host for static files used by the client application. The client initiates an authorization request to the Google API, which then redirects the request to an AWS Lambda function. The Lambda function processes the request and fetches user information from the Google API, presenting it in the application.

React applications are typically developed using modern tools like Vite or Create React App (CRA). After development, the source code is compiled and bundled into static assets, including HTML, CSS, and JavaScript files. These static files can be hosted on Amazon S3, which supports static website hosting by serving content over HTTP. Once the build files are uploaded, S3 efficiently delivers them to users based on incoming HTTP requests.
For this implementation, I opted for the Authorization Code response type, as it provides enhanced security during server-to-server communication by exchanging a temporary authorization code for an access token. This approach minimizes the risk of exposing sensitive tokens directly in the browser. Alternatively, the id_token response type is also a viable option, especially for applications requiring quick authentication without backend communication. However, the code flow is generally preferred for scenarios demanding higher security and scalability.

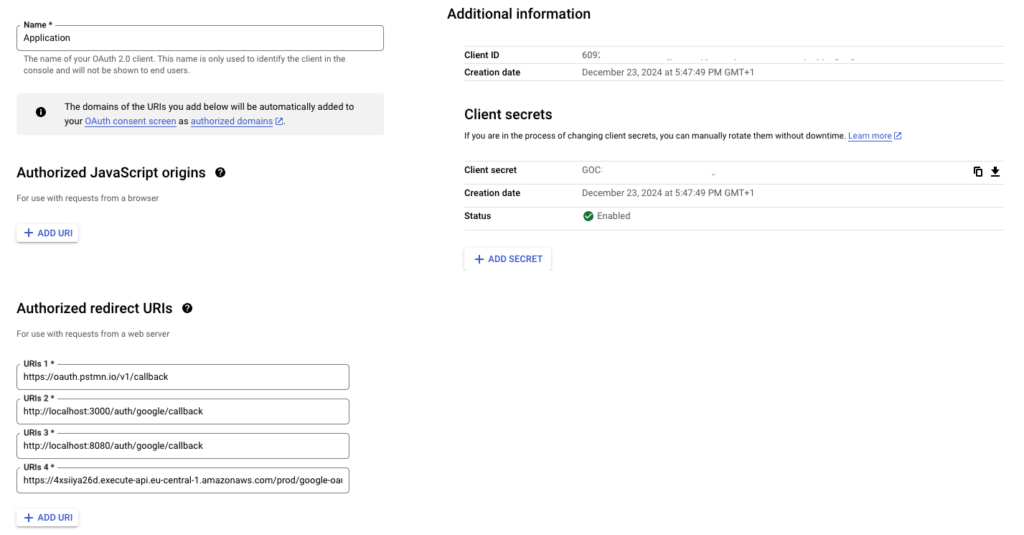
To access Google APIs and services, you need a Client ID and Client Secret. These credentials are required to authenticate your application and enable secure communication with Google’s OAuth2 services. To access Google APIs and services, a Client ID and Client Secret are required. These credentials can be obtained by registering an application on the Google Cloud Console. After signing in, create a new project or select an existing one. Then, navigate to the APIs & Services section to enable the required APIs. Once enabled, open the Credentials tab and generate new credentials by selecting OAuth 2.0 Client IDs. During this process, configure the consent screen and specify redirect URIs to handle authentication callbacks. After completing the setup, download the credentials file, which includes the Client ID and Client Secret, to integrate them into your application securely. Also insert redirect URI into Authorized redirect URIs
These keys are essential for securely handling authentication and authorization processes in your application.
In the described authentication flow, the frontend serves as the entry point. It features a simple button that triggers a URL change, redirecting users to initiate the Google OAuth2 authorization process.
  const googleOAuth = () => {
    const clientId = process.env.REACT_APP_GOOGLE_CLIENT_ID;
    const redirectUri = process.env.REACT_APP_GOOGLE_REDIRECT_URI;
    const scope = 'profile email';
    const responseType = 'code';


    window.location.href = `https://accounts.google.com/o/oauth2/v2/auth?client_id=${clientId}&redirect_uri=${redirectUri}&response_type=${responseType}&scope=${scope}&access_type=offline`
  };

 //SOME CODE
        <button className='btn-main' onClick={googleOAuth}>
          Login through google
        </button>
//SOME CODE
Once the user authorizes access, Google’s server redirects the request to the specified URL, which, in this case, points to an AWS Lambda function. The Lambda function handles the exchange of the authorization code for an access token. Using this token, the Lambda function retrieves user information from Google’s API. The user data is then sent back to the client as a cookie in the response.
This setup serves as a temporary solution. Future enhancements will refactor this flow to return a session instead, enabling the frontend to fetch user details securely through a dedicated endpoint.
public class GoogleOAuthLambda implements RequestHandler<APIGatewayProxyRequestEvent, APIGatewayProxyResponseEvent> {
    private static final String UserInfoUrl = "https://www.googleapis.com/oauth2/v3/userinfo";
    private static final String CLIENT_ID = "CLIENT_ID";
    private static final String CLIENT_SECRET = "CLIENT_SECRET";
    private static final String REDIRECT_URI = "REDIRECT_URI";

    private static final Logger logger = LogManager.getLogger(GoogleOAuthLambda.class);


    @Override
    public APIGatewayProxyResponseEvent handleRequest(APIGatewayProxyRequestEvent input, Context context) {
        context.getLogger().log("Event: " + input.toString());

        Map<String, String> queryParams = input.getQueryStringParameters();
        String authCode = queryParams.get("code");
        String error = queryParams.get("error");

        if (error != null) {
            APIGatewayProxyResponseEvent response = new APIGatewayProxyResponseEvent();
            response.setStatusCode(400);
            response.setBody("Error: " + error);
            return response;
        }

        try {
            HttpTransport httpTransport = new NetHttpTransport();
            JsonFactory jsonFactory = new GsonFactory();

            TokenResponse tokenResponse = new GoogleAuthorizationCodeTokenRequest(
                    httpTransport, jsonFactory, CLIENT_ID, CLIENT_SECRET, authCode, REDIRECT_URI
            ).execute();

            String accessToken = tokenResponse.getAccessToken();

            String userInfo = httpTransport
                    .createRequestFactory()
                    .buildGetRequest(new GenericUrl(UserInfoUrl))
                    .setHeaders(new com.google.api.client.http.HttpHeaders().setAuthorization("Bearer " + accessToken))
                    .execute()
                    .parseAsString();

            APIGatewayProxyResponseEvent response = new APIGatewayProxyResponseEvent();
            response.setStatusCode(303);
            response.setHeaders(Map.of(
                    "Set-Cookie", "userInfo=" + userInfo + "; Path=/; SameSite=None",
                    "Location", "http://localhost:3000/homepage",
                    "Cache-Control", "no-cache, no-store, must-revalidate"
            ));

            return response;
        } catch (Exception e) {
            logger.error("Error getting user info", e);
        }
        return null;
    }
}
Google provides shared libraries that significantly simplify the integration process, making the codebase more compact and easier to maintain.
Since AWS Lambda operates in a minimal runtime environment, the deployment package is shaded to include all required dependencies. This is achieved with a concise Maven POM configuration, ensuring that the Lambda function runs seamlessly without external dependency issues.
                    <plugin>
                        <groupId>org.apache.maven.plugins</groupId>
                        <artifactId>maven-shade-plugin</artifactId>
                        <version>3.2.4</version>
                        <executions>
                            <execution>
                                <phase>package</phase>
                                <goals>
                                    <goal>shade</goal>
                                </goals>
                            </execution>
                        </executions>
                    </plugin>
The AWS Lambda function is publicly accessible through Amazon API Gateway, which acts as the entry point for incoming HTTP requests.
After executing the entire authentication flow from the frontend, the response will include the following headers:
cache-control: no-cache, no-store, must-revalidate
content-length: 0
content-type: application/json
date: Sun, 05 Jan 2025 16:18:32 GMT
location: http://localhost:3000/homepage
set-cookie: userInfo={
  "sub": "[REDACTED]",
  "name": "[REDACTED]",
  "given_name": "[REDACTED]",
  "family_name": "[REDACTED]",
  "picture": "[REDACTED]",
  "email": "[REDACTED]",
  "email_verified": true
}; Path=/; SameSite=None
x-amz-apigw-id: [REDACTED]
x-amzn-requestid: [REDACTED]
x-amzn-trace-id: Root=1-677ab0d8-[REDACTED];Parent=[REDACTED];Sampled=0;Lineage=1:[REDACTED]

Leave a Reply